
Techniques for threading your Singer 301 can dramatically enhance your sewing experience. By mastering these simple methods, you can achieve quick and accurate results, ensuring your projects run smoothly. Avoid common mistakes that can lead to frustrating tangles and breakages. In this post, you’ll discover streamlined steps tailored specifically for the Singer 301, allowing you to save time and focus more on your creativity. Let’s dive in and make your threading hassle-free!
Key Takeaways:
- Familiarize yourself with the threading diagram specific to the Singer 301 to ensure proper alignment of the thread path.
- Utilize the tension adjustment feature to achieve the best stitch quality, which can impact the efficiency of the threading process.
- Practice the threading technique without thread to build muscle memory, making the actual threading process quicker and more intuitive.
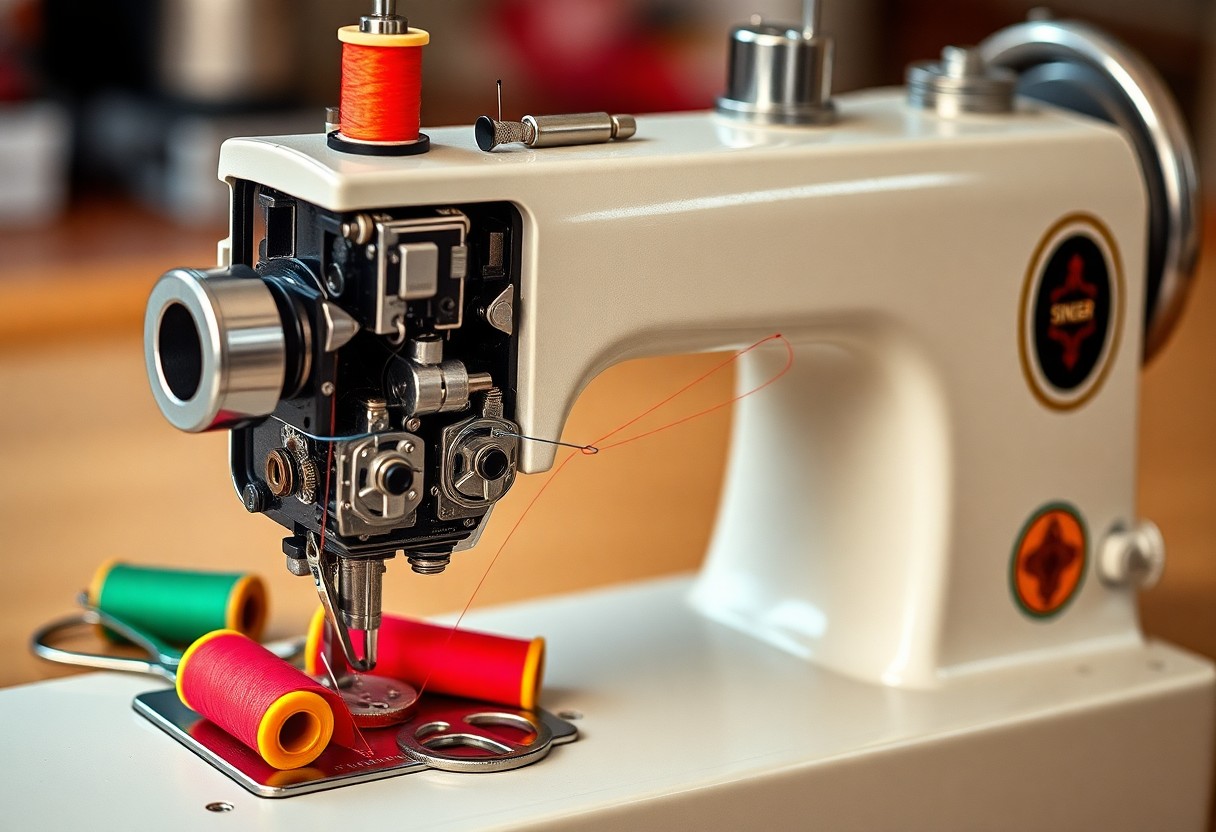
Mastering the Threading Pathway of the Singer 301
Understanding the threading pathway on your Singer 301 is necessary for smooth and successful sewing. By following the correct route for your thread, you ensure that every stitch is flawless and consistent. Familiarizing yourself with the various components of the sewing machine, including thread guides and tension discs, can significantly enhance your sewing experience. Once you grasp the threading pathway, you’ll find that it becomes second nature, allowing your creativity to flow without interruption.
Step-by-Step Threading Process
To avoid confusion, follow these steps to thread your Singer 301 effectively:
| Step | Description |
|---|---|
| 1. | Place the spool of thread on the spool pin. |
| 2. | Guide the thread down through the thread guide. |
| 3. | Wrap the thread around the tension discs. |
| 4. | Pull the thread down through the needle bar. |
| 5. | Thread the needle from front to back. |
Common Missteps and How to Avoid Them
Many sewists encounter issues like thread snags or inconsistent stitches due to common missteps in the threading process. Avoid threading through the tension discs too loosely or bypassing any guides, as this disrupts even tension and leads to frustrating results.
To sidestep these pitfalls, ensure that you are following the threading sequence precisely without skipping any guide or disc. Adjust your thread tension as needed during your test stitching to confirm it’s not too tight or slack. Always check that the presser foot is raised—this opens the tension discs, allowing smoother threading. Moreover, threading the needle from the correct angle can significantly reduce snags or jams, ensuring a seamless sewing experience.
Tools of the Trade: Essential Accessories
Equipping yourself with the right accessories enhances your threading experience on the Singer 301. Essential tools, such as high-quality threads, needles specifically designed for your projects, and invaluable threading aids, make all the difference. Investing in a good pair of scissors and a threading guide will also save you time and ensure accuracy. Utilizing these accessories not only streamlines your workflow but also reduces frustration during the sewing process.
Must-Have Threading Aids
Consider adding a few threading aids to your toolkit for increased efficiency. Threading hooks and needle threaders are excellent options, as they simplify the process of inserting the thread into the needle’s eye. Moreover, having a manual or laminated threading diagram at your workstation can help you stay organized and focused, allowing you to enhance your threading speed and accuracy considerably.
Enhancing Precision with Tweezers and Guides
Employing tweezers and specialized guides adds another layer of precision to your threading process. These tools help you navigate tight spaces and intricate areas of the threading path with ease.
Tweezers equipped with a fine point allow for a delicate grip on small thread pieces, ensuring you can manipulate the thread accurately through tight spaces on your Singer 301. Additionally, threading guides specifically designed for the machine can clearly illustrate the pathway, reducing the chances of misthreading. Utilizing these tools promotes a more efficient workflow, minimizes the risk of damaging the thread or machine, and significantly increases your confidence in tackling complex sewing projects.
Advanced Techniques for Seamless Threading
Mastering advanced techniques will elevate your threading efficiency on the Singer 301. By incorporating these insights, you can streamline the process and ensure flawless operation. Start exploring these strategies:
- Utilize the Right Bobbin: Ensure you use Singer bobbins to avoid tension issues.
- Check Needle Compatibility: Use appropriate needles for your fabric and thread type.
- Practice Consistent Threading: Follow the same threading steps each time for reliability.
- Regular Maintenance: Keep your machine clean and lubricated for optimal performance.
- Test Stitches: Always test stitch on scrap fabric before starting your main project.
| Best Practices | Description |
|---|---|
| Keep Thread Tension Balanced | Adjust upper and lower tensions for ideal stitch quality. |
| Threading with the Presser Foot Up | Ensures proper thread feeding and reduces tension issues. |
| Use Quality Thread | Invest in premium threads to prevent breakage and snagging. |
The Art of Tension Adjustment
Adjusting your tension settings can make a significant difference in stitching quality. Tweaking the upper and lower tension helps manage thread flow, leading to flatter seams and sharper stitches. The right balance prevents fabric puckering, ultimately ensuring your projects turn out just the way you envisioned.
Timing Your Threading Technique with the Foot Pedal
Synchronizing your threading technique with the foot pedal can transform your sewing experience. Finding a comfortable pace allows for better control while threading.
When you start using the foot pedal, gradually experiment with your speed. Too fast might cause unnecessary strain, while too slow can disrupt your rhythm and make threading tedious. Try to maintain a steady pace that suits your hand movements, ensuring you can navigate each threading step without hesitation, leading to a more seamless sewing journey.

Troubleshooting Common Threading Problems
Even with finesse in threading the Singer 301, you might still encounter a few common issues. Knowing how to troubleshoot these problems quickly can save you time and prevent frustration. Whether you’re dealing with skipped stitches or a jumbled bobbin, recognizing the signs early is key. Observing unusual thread behavior can help you address these issues effectively before they escalate into bigger sewing dilemmas.
Identifying Unusual Thread Behavior
Unusual thread behavior often manifests through unexpected tangles, uneven stitches, or excessive thread bunching. Pay attention to the sounds and appearances as you sew; muffled sewing noises or noticeable snags can indicate improper threading or tension issues. Use these visual and auditory cues to spot trouble before it disrupts your entire project.
Quick Fixes for Frequent Issues
Some threading problems can be resolved with simple adjustments, minimizing downtime. A common fix is to rethread both the upper thread and bobbin, ensuring you follow the correct path precisely. Additionally, adjust the tension settings based on your fabric; different textiles may require looser or tighter tension for optimal performance. Lastly, clean your machine regularly to prevent lint buildup from causing jams.
For example, if you experience skipped stitches, check the bobbin’s placement and rethread it if necessary. Often, the bobbin may not be seated correctly, leading to thread issues. If your stitches are too loose or tight, adjusting the tension dial by a few notches can lead to instant improvements. Regularly inspecting your needle for wear and replacing it if it’s damaged will also help maintain a fluid sewing experience. These quick fixes not only enhance performance but also extend the life of your Singer 301.
Expert Tips for Maintaining Your Singer 301
Taking good care of your Singer 301 ensures its longevity and reliability. Focus on these expert tips to keep your machine humming smoothly:
- Clean your machine regularly to prevent dust and lint build-up.
- Oil the crucial parts per your manual’s guidance to maintain smooth operation.
- Check for loose screws and belts to avoid mechanical issues.
- Store your machine properly to avoid unnecessary damage.
Any minor attention can prevent future headaches and keep your Singer 301 in top shape.
Regular Maintenance to Ensure Optimal Performance
Schedule routine check-ups for your Singer 301, cleaning it thoroughly after each use. Utilize a soft brush or vacuum to remove lint, and check the needle, thread tension, and bobbin regularly. By maintaining cleanliness and checking these components often, you’ll ensure smooth sewing sessions and avoid potential disruptions.
Proactive Care: Preventing Future Mysteries
Implementing proactive care measures protects your Singer 301 from unexpected issues. Regularly inspect the machine for wear and tear, and replace parts as necessary to prevent complications. Keeping a log of your maintenance schedule can help track any irregularities, allowing you to spot trends or reoccurring issues before they escalate.
Incorporating these practices can significantly enhance your sewing experience. By staying vigilant and conducting thorough checks, you can safeguard your Singer 301 from potential problems down the line. Establishing a routine helps you recognize any inconsistencies in performance early, ensuring your machine remains a trusted companion for years to come. Don’t forget that preventive measures are often more effective than troubleshooting later on.
Summing up
Hence, utilizing these straightforward techniques for threading your Singer 301 will not only save you time but also enhance your sewing projects’ quality. By following the outlined steps carefully and paying attention to your machine’s features, you can achieve accurate threading every time. With practice, you’ll become more efficient, allowing you to focus on creativity and craftsmanship rather than troubleshooting threading issues. Your sewing experience will improve significantly as you master these vital methods.
FAQ
Q: What are the key steps for threading the Singer 301 machine quickly?
A: To thread the Singer 301 machine efficiently, start by raising the presser foot. This releases the tension discs, allowing the thread to pass through easily. Next, place your spool of thread on the spool pin and guide the thread through the threading path, following the numbered diagrams usually located on the machine. Ensure it passes through the tension disk and wraps around the take-up lever before proceeding down towards the needle. Finally, thread the needle from front to back, making sure the thread is seated properly. Following these steps ensures a smooth threading process.
Q: How can I ensure my thread tension is set correctly after threading?
A: After you’ve threaded your Singer 301, it’s important to check the thread tension for optimal performance. Start by setting the tension dial to the recommended setting, typically around 4 or 5 for standard stitching. Test the tension by sewing a few stitches on a scrap piece of fabric; if the stitches appear loose, increase the tension, and if they look too tight, decrease it. Also, ensure that the thread is seated correctly in the tension discs. Making adjustments based on your initial tests will help achieve a balanced stitch.
Q: What should I do if my thread keeps jamming while sewing?
A: If your thread keeps jamming during sewing, first check that the machine is threaded correctly following the proper path. A common issue is that the thread may be caught or tangled in the tension discs or bobbin area. Remove the bobbin and check it for proper winding and placement. Also, inspect the needle for bends or dullness, which can cause fabric drag and thread jams. Using a new needle and ensuring the machine is threaded properly will often resolve these issues. If jamming persists, consider cleaning the bobbin area and removing any lint or debris that may interfere with the threading mechanism.