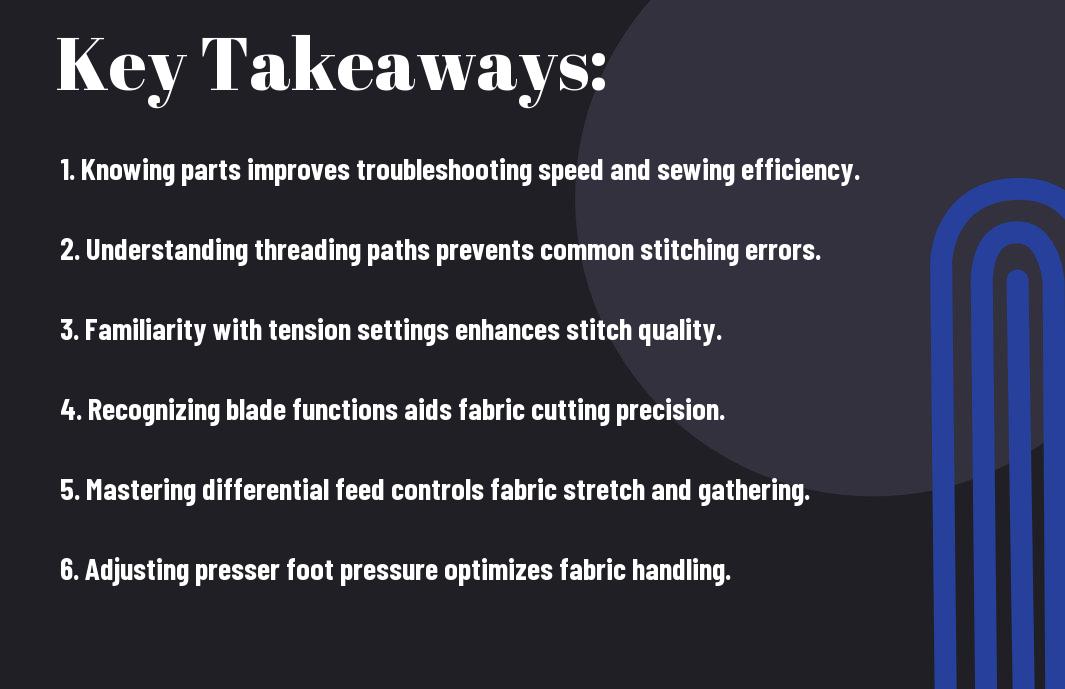
Just by grasping the intricate anatomy of your serger, you open the door to a new level of sewing proficiency. When you understand how each component works together, you can troubleshoot problems, optimize your machine’s performance, and make the most of its diverse capabilities. This knowledge not only enhances your sewing experience but also allows you to create projects with greater precision and confidence. Dive in to explore how mastering your serger’s design can elevate your skills and expand your creative possibilities.
The Essential Parts of a Serger Machine
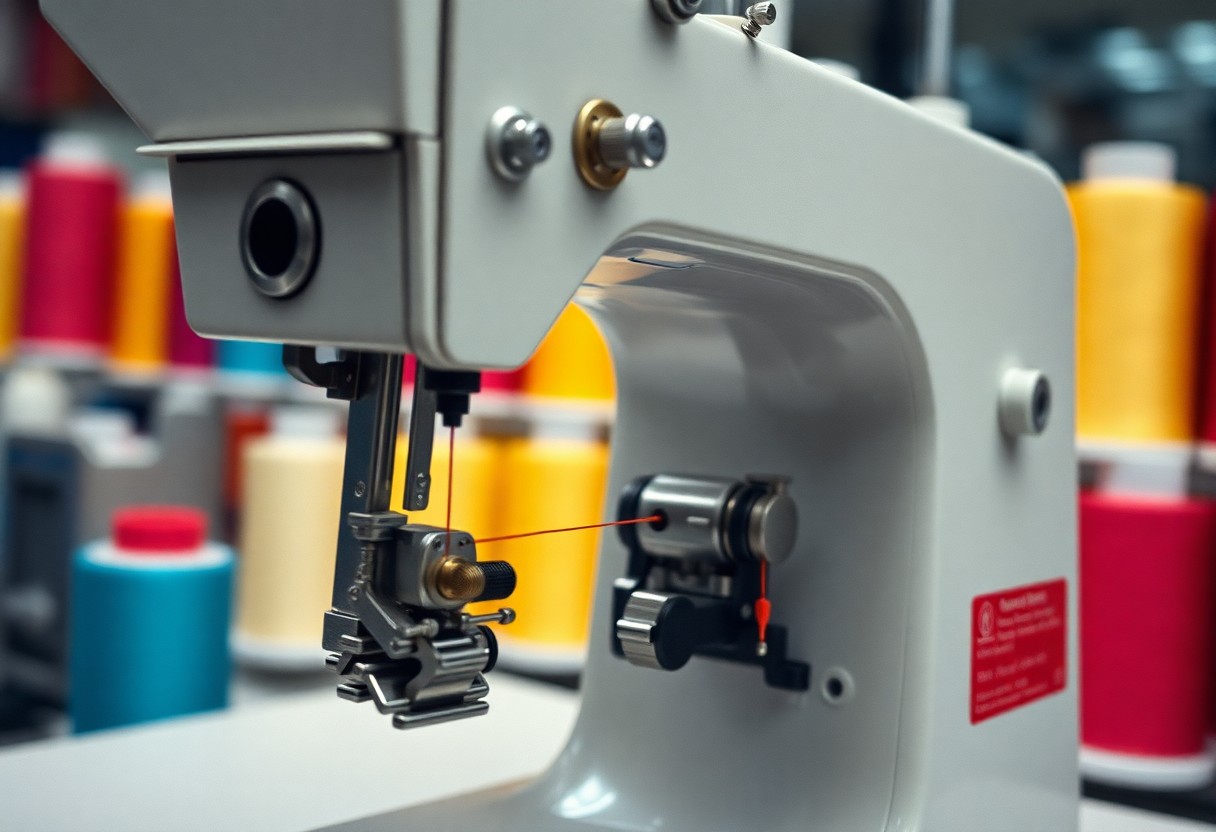
Every serger machine is composed of several integral components, each playing a vital role in the functionality and performance of your sewing projects. Understanding these parts not only simplifies troubleshooting but also enhances your overall sewing experience. Familiarizing yourself with components such as the needles, looper, and presser foot will empower you to make informed adjustments, ensuring your creations turn out just as you envision them.
Critical Components and Their Functions
Among the key parts of a serger, the needles facilitate the stitching, while the loopers create the overlock stitches that characterize serger machines. The presser foot ensures fabric is fed smoothly through the machine, while the cutting blade trims the fabric edges for a clean finish. Understanding how these elements work in tandem allows you to manipulate settings to achieve your desired results more precisely.
Understanding Stitch Formation Mechanics
Grasping the mechanics of stitch formation reveals how thread tension and needle placement influence your serger’s output. The tension disks control the flow of both needles and looper threads, contributing to balanced or adjusted stitch formation. Fine-tuning the tension helps you tackle various fabric types and thicknesses, resulting in a professional finish. Additionally, switching between different stitch types involves understanding how needle and looper threads interact during sewing—this knowledge can elevate the appearance and durability of your finished project.
Decoding the Tension Settings
Tension settings on your serger can dramatically influence the quality of your stitches. Correctly adjusting these settings allows you to achieve a variety of professional-looking hems and finishes. Each thread, from the upper looper to the lower looper, has its own tension, which you must manipulate based on the fabric type and stitch you’re accomplishing, ensuring no puckering or loose threads disrupt your project. Gaining a clear understanding of how these settings work can elevate your sewing skills to a new tier of mastery.
The Science of Thread Tension
The mechanics of thread tension involve a delicate balance between the upper and lower threads. Essentially, the upper tension controls how tightly the upper threads pull, while the lower tension balances it out. Achieving the perfect tension means that the threads interlock seamlessly within the fabric, creating a flat, professional finish. Over-tightening can cause thread breakage, while too little tension can lead to loops and unsightly seams.
Balancing Tension for Different Fabrics
Adjusting tension settings is imperative for various fabric types to achieve optimal results. For lightweight fabrics, decrease tension to prevent puckering, while heavier materials often require increased tension to avoid distortion. By fine-tuning these settings, you can ensure that stitches sit flat against the fabric and maintain their integrity during wear and washing.
The weight and weave of different fabrics necessitate a thoughtful approach to thread tension. For example, when working with stretchy knits, you may want to lighten the tension on your upper threads; this maintains the fabric’s elasticity without creating unnecessary strain. Conversely, sewing with thicker fabrics like denim demands higher tension to secure the threads firmly together. Testing a scrap piece before committing to your final project helps you find the ideal balance for seamless results.
Exploring Serger Stitch Types and Their Applications
Understanding the various serger stitch types allows you to tailor your creations to suit specific projects effectively. A serger provides multiple stitch options, including overlock, flatlock, coverstitch, and chain stitch, making it a versatile tool in your sewing arsenal. Each type has unique properties that enhance fabric handling and finish. Here are some key stitches to consider:
- Overlock Stitches: Perfect for finishing edges to prevent fraying.
- Flatlock Stitches: Ideal for creating a design feature and reducing bulk for seams.
- Coverstitch: Excellent for hemming and adding professional-looking finished edges.
- Chain Stitch: Great for stretchy fabrics, providing a durable and flexible seam.
| Stitch Type | Application |
|---|---|
| Overlock | Edge finishing |
| Flatlock | Decorative seams |
| Coverstitch | Hemming |
| Chain Stitch | Stretch seams |
| Rolled Hem | Delicate edges |
The Versatility of Overlock Stitches
Overlock stitches are the backbone of many serger functions, allowing you to achieve professional-grade seams effortlessly. These stitches loop around the fabric’s edge, trimming excess material, which serves both a functional and aesthetic purpose. Utilizing overlock stitches on woven fabrics minimizes fraying and creates clean edges. They can also lend a slight stretch to seams, making them ideal for knit fabrics. After you become proficient in using overlock stitches, you will open up a world of sewing possibilities!
Specialty Stitches for Advanced Techniques
Delving into specialty stitches on your serger introduces innovative techniques to elevate your sewing projects. These stitches, including decorative overlock, pintucks, and rolled hems, can transform simple garments into unique pieces. Each specialty stitch requires different settings and techniques that you can master over time, expanding your creative options. Exploring these stitches also enhances your understanding of fabric dynamics and how various stitches interact with materials.
- Decorative overlock adds flair to edges.
- Pintucks offer texture and style.
- Rolled hems achieve professional-quality finishes.
- Gathering stitches create lovely ruffles.
- Ribbon or lace insertion adds elegance.
| Specialty Stitch | Uses |
|---|---|
| Decorative Overlock | Edge embellishment |
| Pintucks | Textural design |
| Rolled Hem | Finishing delicate fabrics |
| Gathering Stitch | Creating ruffles |
| Inserting Laces | Accentuating seams |
Troubleshooting Common Serger Issues
Serger machines can be temperamental, leading to potential sewing interruptions. Identifying common issues, from thread tension variations to unthreaded needles, is crucial for maintaining seamless sewing productivity. By understanding the machine’s anatomy, you can efficiently diagnose and resolve problems, ensuring that your workflow remains uninterrupted and your creative projects come to life.
Diagnosing Problems Through Anatomy
When faced with a malfunction, inspecting the anatomy of your serger offers insights into the source of the issue. Components such as the
Practical Fixes to Enhance Performance
Several straightforward adjustments can make a significant difference in your serger’s performance. Regularly cleaning the machine, adjusting the tension settings, and ensuring that the threading is accurate can prevent many common issues. For instance, clearing lint from the feed dogs and mouth can enhance fabric feed and stitch quality, allowing for smoother operation.
Once you address basic maintenance, consider recalibrating tension settings to accommodate various fabrics. Snugging the tension for lightweight materials can often lead to cleaner edges, while loosening it for thicker fabrics helps to avoid puckering. Moreover, experimenting with different thread types—such as elastic threads on knits—can transform your sewing experience. Keep a log of adjustments and their outcomes; over time, this will build your confidence in troubleshooting and maximizing your serger’s capabilities.
Elevating Your Technique with Advanced Serger Skills
Techniques for Creative Finishes
Refining your serger skills leads to unique design possibilities. By mastering techniques like rolled hems and picot edges, you can transform simple edges into decorative finishes. These methods allow you to add depth and flair to garments and crafts, making them stand out with professional polish.
Integrating Sergers into Complex Projects
Incorporating a serger into more intricate designs opens up a world of enhanced creativity and construction efficiency. You can tackle projects such as layered garments, multi-fabric quilts, and detailed home décor items. The versatility of a serger not only simplifies seam finishes but also offers you various stitch types to achieve that bespoke look while maintaining durability.
| Advanced Techniques | Description |
|---|---|
| 3-Thread Overlock | Perfect for lightweight fabrics, provides a clean finish and stretch capability. |
| Narrow Hemming | Creates a delicate finish ideal for sheers and lightweight fabrics. |
| Flatlocking | Used for decorative seams and applications, gives a flat finish ideal for activewear. |
| Binding Edges | Provides a clean edge finish, perfect for quilts and home textiles. |
Integrating sergers into complex projects not only elevates your sewing game but also significantly reduces construction time. Imagine creating a multi-layered dress with intricate seams; a serger allows you to finish edges swiftly while maintaining strong, flexible seams. By allowing for adjustments and providing options like piping and binding, sergers support a variety of styles and applications, making them indispensable for any designer looking to push their creative boundaries.
To wrap up
From above, you can see that comprehending a serger’s anatomy can significantly elevate your sewing skills. By familiarizing yourself with each component—from the differential feed to the tension settings—you empower yourself to troubleshoot issues and optimize performance. This knowledge allows you to make informed adjustments, enhance your sewing projects, and achieve professional-quality finishes. Ultimately, understanding your serger transforms it from a complex machine into a reliable partner in your creative journey, giving you the confidence to explore new techniques and expand your sewing repertoire.
Q: What are the main components of a serger that every sewer should understand?
A: Understanding a serger involves familiarizing yourself with its crucial components. Key parts include the upper and lower knife, loopers, needles, and differential feed mechanism. The upper and lower knives are responsible for cutting the fabric edges, while the loopers create the overlock stitches. Needles play a key role in forming stitches, and the differential feed allows for fabric adjustment to prevent stretching or puckering. Mastering these parts will enable you to troubleshoot issues and optimize stitch quality.
Q: How does knowledge of a serger’s threading system affect my sewing results?
A: The threading system of a serger is vital for achieving the desired stitch quality. Each thread has a specific path it must follow to function correctly. By understanding how to thread your serger properly—whether it’s with a color-coded system or a manual—you can avoid common pitfalls such as thread breaking or uneven stitches. Moreover, knowing how to adjust tensions for each thread type can significantly enhance the final look of your seams and hems.
Q: In what ways can mastering a serger’s settings improve the versatility of my sewing projects?
A: Mastering a serger’s settings can greatly expand the range of projects you undertake. A serger typically offers adjustable stitch width, length, and tension settings. By experimenting with these adjustments, you can create different types of stitches suited for various fabrics, such as rolled hems for lightweight materials or wide cover stitches for knits. This adaptability allows you to take on a broader spectrum of sewing projects with confidence, whether making garments, home décor, or accessories.